Glute Bridges: Video Tutorial & Exercise Guide

| Workout | Glute Bridges |
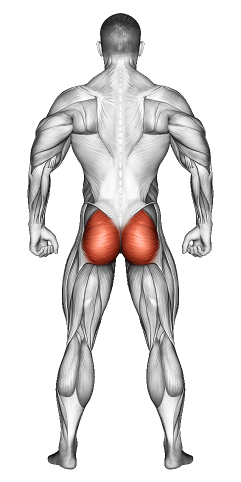
| Primary Muscle Group | Glutes |
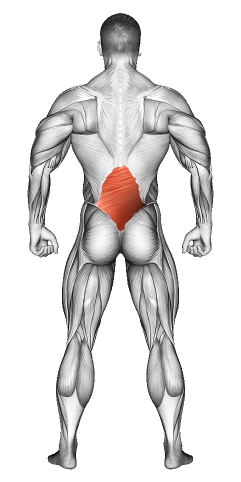
| Secondary Muscle Group | Hamstrings, Lower Back |
| Equipment Required | None (Optional: Resistance Band or Weights) |
| Force Type | Bodyweight |
| Mechanics | Isolation |
| Exercise Type | Strength |
| Difficulty | Beginner |
Glute Bridges: Video Tutorial & Exercise Guide
Secondary Muscles Group

Glute Bridges: Step-by-Step Guide
- Step 1: Lie on your back with your knees bent and feet flat on the floor, about hip-width apart. Keep your arms by your sides with your palms pressing down for stability.
- Step 2: Tighten your core and squeeze your glutes. Push through your heels to lift your hips up toward the ceiling. Lift until your body forms a straight line from shoulders to knees.
- Step 3: Hold this position at the top. Focus on squeezing your glutes and keeping your core engaged. Maintain a straight line without arching your lower back.
- Step 4: Lower your hips back down slowly and with control, but don’t let your glutes rest fully on the floor. Keep tension on your muscles.
- Step 5: Repeat for the set number of reps. Stay mindful of each movement, feeling the contraction in your glutes as you lift.
Glute Bridges: Overview
Glute Bridges build strength and tone in your glutes and hamstrings while also activating your core. This exercise boosts hip stability, engages the glutes fully, and strengthens your lower body. Use Glute Bridges in your lower body workout, as a warm-up, or even as a standalone move for glute activation.
Glute Bridges: Benefits
Glute Bridges strengthen your glutes, improve hip stability, and engage your core. This move helps develop a stronger, firmer backside and reduces the risk of lower back strain by supporting proper hip function. Regular Glute Bridges also increase hip mobility and flexibility.
Glute Bridges: Pro Tips & Advanced Techniques
- Drive Through Your Heels: Pressing through your heels fully activates your glutes and keeps the focus away from your lower back.
- Hold and Squeeze at the Top: Take a brief pause at the top of each rep to maximize the glute contraction.
- Add Resistance: Use a resistance band above your knees or place a weight across your hips for added challenge.
- Breathe with Control: Exhale as you lift, inhale as you lower. Controlled breathing helps maintain focus and form.
Glute Bridges: Progression Plan
Beginner
Intermediate
Advanced
Glute Bridges: Frequently Asked Questions (FAQs)
What muscles do Glute Bridges target?
+Glute Bridges work your glutes primarily, with secondary activation in your hamstrings and core.
Can I add Glute Bridges to any workout?
+Absolutely! Glute Bridges fit well in leg day routines, warm-ups, or as part of glute activation exercises.
How do Glute Bridges improve hip stability?
+Glute Bridges activate your glutes and core, which support and stabilize your hips, enhancing balance.
Do Glute Bridges help with back pain?
+Yes! Glute Bridges strengthen your glutes and core, which helps support the lower back and can reduce discomfort.
How often should I do Glute Bridges?
+Include Glute Bridges 2-3 times a week to build glute strength and improve hip stability.
What mistakes should I avoid?
+Avoid arching your back. Focus on squeezing your glutes, pressing through your heels, and keeping each lift controlled for best results.