Marching Glute Bridges: Video Tutorial & Exercise Guide

| Workout | Marching Glute Bridges |
| Primary Muscle Group | Glutes |
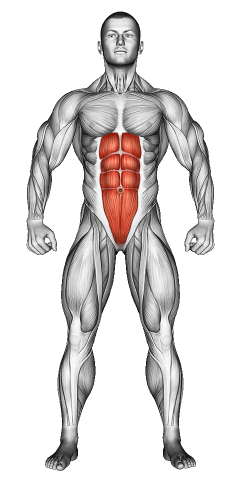
| Secondary Muscle Group | Hamstrings, Abs |
| Equipment Required | Mat |
| Force Type | Push |
| Mechanics | Isolation |
| Exercise Type | Lower Body Stability |
| Difficulty | Beginner to Intermediate |
Marching Glute Bridges: Video Tutorial & Exercise Guide
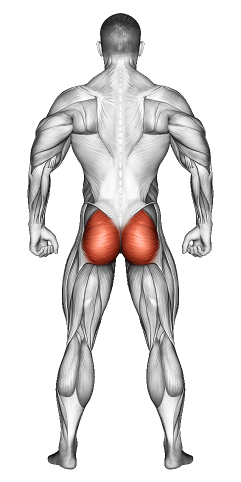
Secondary Muscles Group

Marching Glute Bridges: Step-by-Step Guide
- Step 1: Lie on your back on a mat with your knees bent and feet flat on the floor, hip-width apart. Place your arms by your sides with your palms facing down. Engage your core to create stability.
- Step 2: Press through your heels to lift your hips up, creating a straight line from your shoulders to your knees. Squeeze your glutes at the top of the bridge to fully activate them.
- Step 3: Lift your right foot off the ground, bringing your right knee toward your chest. Keep your hips up and steady, using your core and glutes to control the movement.
- Step 4: Lower your right foot back down with control, returning to the bridge position without letting your hips drop.
- Step 5: Switch to your left leg, bringing your left knee toward your chest while maintaining your bridge. Alternate legs in a marching rhythm, keeping your core tight and hips level with each movement.
- Step 6: Breathe with each rep. Inhale as you lower your foot and exhale as you lift your knee. Focus on steady breathing to help you maintain control.
Marching Glute Bridges: Overview
Marching Glute Bridges add a stability challenge to the traditional glute bridge. This move strengthens your glutes, hamstrings, and core, improving balance and hip stability. Marching Glute Bridges are perfect for building lower body strength and challenging your core while adding variety to your glute routine.
Marching Glute Bridges: Benefits
Marching Glute Bridges build strength in your glutes, hamstrings, and core. They improve hip stability, enhance balance, and support lower body strength. This exercise provides a solid foundation for strong, stable hips and core, making it valuable for anyone working to strengthen their lower body.
Marching Glute Bridges: Pro Tips & Advanced Techniques
- Focus on Hips: Keep your hips level and steady with each leg lift. This focus keeps the movement effective and targets your glutes and core.
- Engage Core Fully: Tighten your core to help maintain balance and control throughout the exercise.
- Move Slowly: Slow down each rep to build strength and stability. Controlled movements give you better results.
- Breathe Consistently: Inhale as you lower, exhale as you lift. This rhythm supports balance and keeps you focused.
Marching Glute Bridges: Progression Plan
Beginner
Intermediate
Advanced
Marching Glute Bridges: Frequently Asked Questions (FAQs)
What muscles do Marching Glute Bridges work?
+Marching Glute Bridges target your glutes, hamstrings, and core, helping build lower body strength and stability.
Can I add Marching Glute Bridges to any workout?
+Yes! This move fits well in lower body or core workouts and works great as a glute activation warm-up.
Do Marching Glute Bridges improve hip stability?
+Yes, they strengthen your glutes and core, which stabilizes your hips and enhances balance.
How often should I do Marching Glute Bridges?
+Include them 2-3 times a week to build glute and core strength.
What mistakes should I avoid?
+Avoid dropping your hips or twisting as you lift each leg. Focus on keeping your core tight, moving with control, and maintaining a steady, level position for the best results.